
A packing list template gives you one place to record what is going into a shipment, a storage box, or a travel bag. Instead of relying on memory, you can list each item, record its quantity, assign it to a package, and mark the line as packed after checking the contents. A clear packing checklist also helps another person find an item without opening every container.
The editable Excel packing list available here combines item details with automatic quantity and weight totals. It includes a package reference, category column, and a Yes or No packed status. Use the workbook for a small business dispatch, an office move, event supplies, or a personal packing checklist. The example rows show how the calculations work and can be replaced with your own information.
Download the editable Excel packing list
The workbook contains a prepared entry area for twenty line items, a short shipment reference section, and summary figures above the list. Amber cells are intended for your entries. The pale blue calculation column works out the weight of each line from its quantity and unit weight. You can change the wording of the categories and package references without rebuilding the sheet.
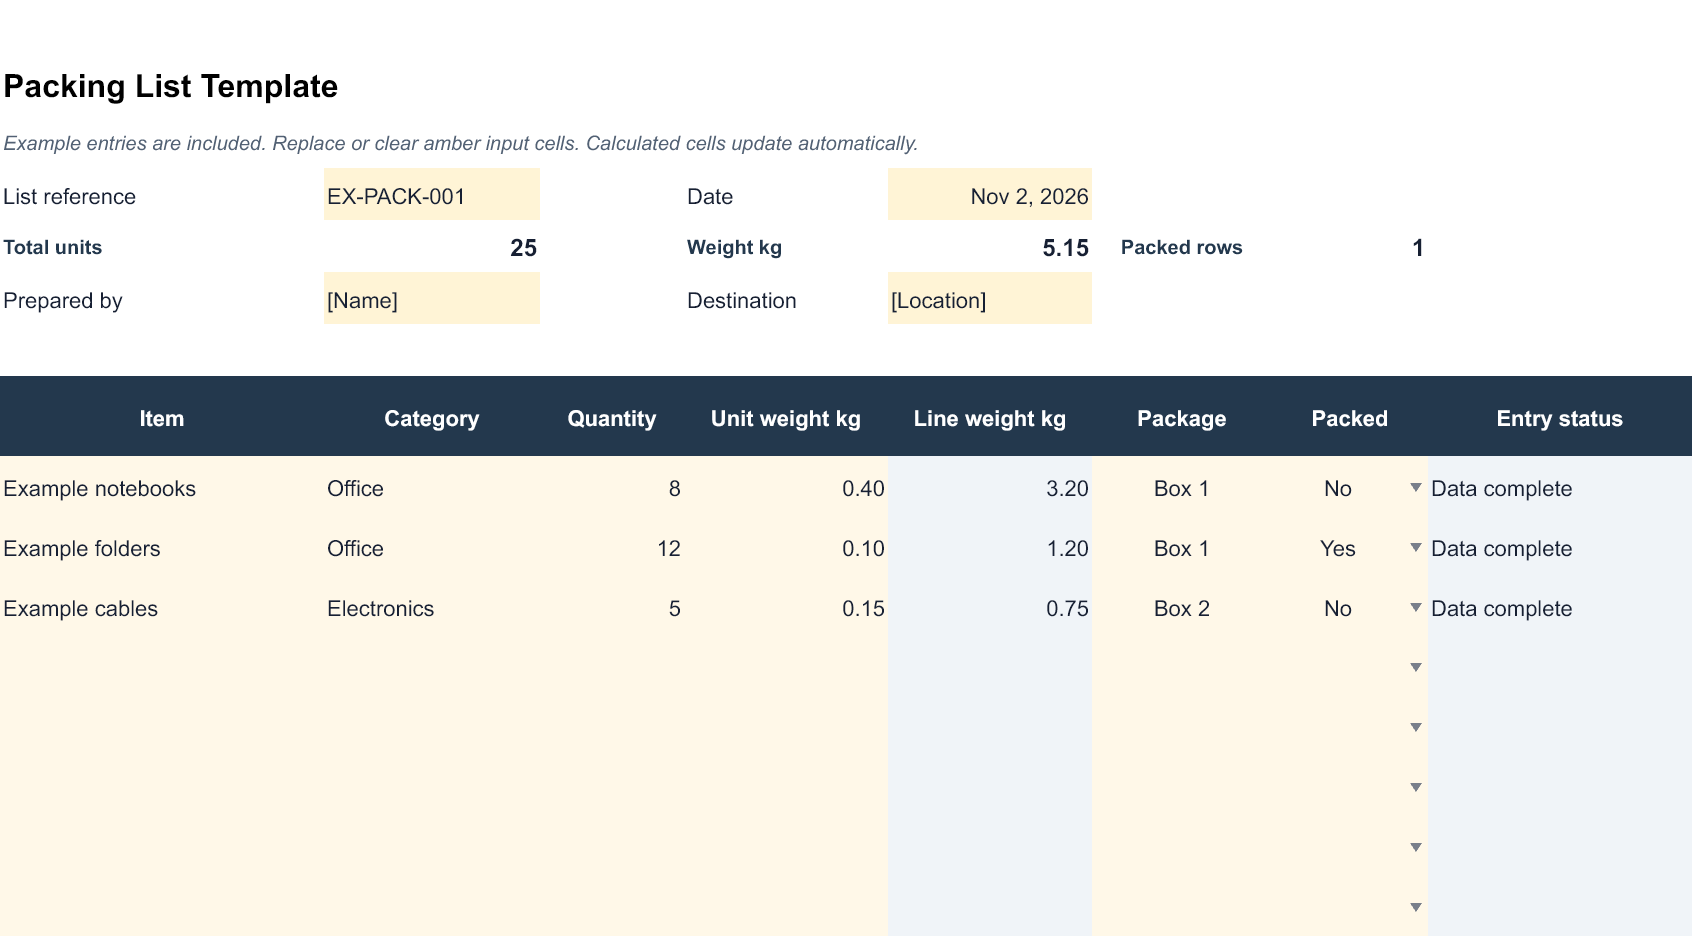
The preview is rendered from the downloadable spreadsheet. It shows illustrative entries, not the contents of a real shipment. Keep a clean master file, then save a separate copy for each order, move, trip, or event. The additional examples farther down the page may provide other layout ideas, but the new Excel download is the main working template described in this guide.
What a useful packing list should tell you
A useful list answers practical questions. What is being packed? How many units are included? Which box contains them? Has someone checked the contents? If weight matters, the list should also make the measurement basis clear. These questions determine the columns you need more reliably than choosing a design only because its preview looks attractive.
For a business shipment, an item name such as “cables” may be too vague. A description such as “USB charging cable 1 metre” is easier to match to an order. For a house move, “kitchen utensils” might be sufficient if the purpose is locating a box rather than checking individual stock. Choose the level of detail that fits the person who will use the list.
The workbook is an organizing aid. A shipping packing list does not automatically replace an invoice, a carrier label, or documents requested by a receiving organization. If a shipment has specific documentation requirements, confirm them with the relevant carrier, recipient, or authority and add the required references to your working copy.
Understand the columns before entering items
Item identifies the contents of a line. Use a product description, supply name, or a clear group of related objects. Add an item code to the description when two products have similar names. Avoid combining unrelated items merely to reduce the number of rows, because that makes the final check harder.
Category groups items for sorting or scanning. A workplace dispatch might use Office, Electronics, and Display Materials. A travel checklist might use Documents, Clothing, Toiletries, and Equipment. Use the same category wording throughout one list so that a later filter does not split one group into several almost identical labels.
Quantity records how many units the row represents. Decide what a unit means before entering numbers. Three individual notebooks and three cartons of notebooks are different quantities. Include the unit in the item description when necessary, especially if the shipment mixes individual products, packs, and sets.
Unit weight kg is the weight of one unit in kilograms. The Line weight kg column multiplies quantity by that figure. The workbook uses one consistent weight unit; it does not convert grams or pounds automatically. Convert a measurement before entering it rather than mixing units and relying on the total to reveal the mistake.
Package identifies the box, bag, crate, or other container. Use references that can also be written on the physical package, such as Box 1 or Equipment Bag A. The Packed column records Yes or No for the line item. Mark Yes only after checking the stated quantity and placing it in the assigned container.
Entry status flags a missing item name, quantity, or unit weight. It also identifies negative quantities or weights for review. The weight summary stays blank while one of these required details needs attention, rather than presenting an incomplete sum as a finished total. A status of Data complete confirms the row has the required weight information; it does not mean the contents have been physically checked or packed.
Complete the packing sheet in a reliable order
Begin with the list reference, date, person preparing the list, and destination. These details help distinguish similar files and printed copies. A reference can relate to an order, an event, or a move. Use an identifier that your team already recognizes instead of creating a complicated numbering system just for this spreadsheet.
Next, enter the expected items and quantities from the order, inventory record, or preparation checklist. At this stage, the list describes what should be included. Assign a package reference to each line, then enter unit weights if you need the weight calculation. Review the descriptions before starting the physical packing process.
During packing, compare the actual item and quantity with the row, place the contents in the named package, and update the packed status. If an item is unavailable or substituted, change the list to reflect the actual contents and explain the change where the recipient will see it. Do not mark a row complete simply because the packing task has been assigned.
Finish with a second scan of the package references and totals. Confirm that the labels on the containers match the spreadsheet. If another person is receiving or loading the boxes, share the final copy they will actually use rather than an earlier draft with unresolved quantities.
Worked example using the sample rows
The example workbook includes eight notebooks at 0.40 kg each, twelve folders at 0.10 kg each, and five cables at 0.15 kg each. The line weights are 3.20 kg, 1.20 kg, and 0.75 kg. Together, those lines contain twenty-five units with a calculated item weight of 5.15 kg. The figures are illustrative and should be replaced before using the file.
Suppose you change the notebook quantity from eight to ten. The notebook line becomes 4.00 kg, the quantity total becomes twenty-seven, and the calculated item weight becomes 5.95 kg. This relationship makes the spreadsheet useful when an order changes: you can revise the input quantity and check the resulting totals without editing several displayed figures manually.
The sample packed-row total counts lines marked Yes. It does not count individual units. If the folder line is the only row marked Yes, the packed-row total is one, even though twelve folders are packed. This distinction matters when reporting progress. Use the quantity and packed status together rather than interpreting the packed-row count as a physical item count.
Adapt the list for shipments moves and travel
For a shipping packing list, use precise product descriptions and package labels that match your dispatch process. If one product is split between two boxes, use separate rows so that each package has an accurate quantity. Add an order reference or recipient detail when needed. Keep commercial prices in an invoice unless your process specifically calls for them on the packing sheet.
For an office or home move, make the package reference the main organizing feature. A category can identify a room or department, while the item description explains the contents. You may prefer to leave weight inputs unused and focus on a complete box inventory. Keep an extra copy of the list accessible during unloading, when the original packing arrangement may no longer be obvious.
For travel, replace the example categories with the groups you normally pack. Use quantities for items such as shirts or chargers, and use the package column for Cabin Bag, Checked Bag, or Personal Bag if helpful. The sheet is a starting structure, not a destination-specific travel recommendation. Add items required for your own itinerary, activities, and circumstances.
Printing and sharing the finished checklist
Before printing, set the print area around the filled list and choose a page orientation that keeps the column headings readable. A landscape layout is often convenient for this spreadsheet. Check print preview to make sure the item descriptions and package references fit. Avoid shrinking the entire sheet until the text becomes too small to use beside the actual boxes.
If the list spans several pages, repeat the header row in your spreadsheet application's print settings and keep the list reference visible on each copy where practical. For a recipient who only needs to read the list, you can export a PDF after the final check. Keep the editable Excel version as the working record so later amendments remain possible.
Common mistakes to avoid
One common error is entering the weight of a whole carton as the unit weight while also using the number of products inside that carton as the quantity. That counts the same weight repeatedly. Another is changing a calculated line weight directly, which breaks the relationship between the inputs and the result. Edit the quantity or unit weight instead.
Package labels also deserve attention. Box 01 and Box 1 may look like different containers to someone scanning a list, even if the packer intended the same reference. Keep labels consistent, remove unused example rows, and check that each Yes status refers to the final quantity. Small changes after a final review should trigger a quick recheck of the affected package.
Frequently asked questions
Can I edit the packing list without changing formulas
Yes. Replace the text, quantities, unit weights, package references, and packed status in the input cells. Leave the calculated line-weight cells intact. If you need more than the prepared rows, copy a complete prepared row so its formulas and formatting carry forward, then extend any summary ranges to include the added entries.
Does the total weight include the box and packaging
The displayed total adds the calculated item weights entered in the list. It does not automatically add an empty box, padding, pallet, or other packaging. If you need a packed shipment weight, measure the finished package or record packaging weight separately and label the result clearly.
Can this file be used as a packing slip
It can provide the basic item, quantity, and package information used in a packing slip. Review the receiving organization's requirements and add any necessary order or recipient references. The template does not determine which commercial or transport documents your particular shipment requires.
Should every image example have an editable download
The main Excel template above is an editable download with a matching preview. Some older examples retained on this page are visual references. Use the explicitly labeled download link when you need a working file, and check the file format before choosing an example for your own process.
More packing list examples
Download Packing List Template:


Packing List Samples

Shipment Packing List

College Packing List Sample

Packing List For Vacations

Trip Packing List

Packing List For Family Tour

Packing Checklist

Product Packing List

Packing List for Business Use

Company Packing List

Personal Packing List Example

Packing List For Order

Printable Packing List




You must be logged in to post a comment.