
There is something magical about watching a kite you built yourself climb into the sky. Making a kite is a classic family activity, a wonderful STEM project for classrooms and a fun way to spend a windy weekend outdoors. Our free printable kite template gives you a ready-made diamond kite pattern, a materials list and clear step-by-step instructions, so children and adults alike can build a kite that really flies.
Preview the template below, download the editable DOCX file, and follow our complete guide to building, decorating and flying your homemade kite.
Download the free printable kite template
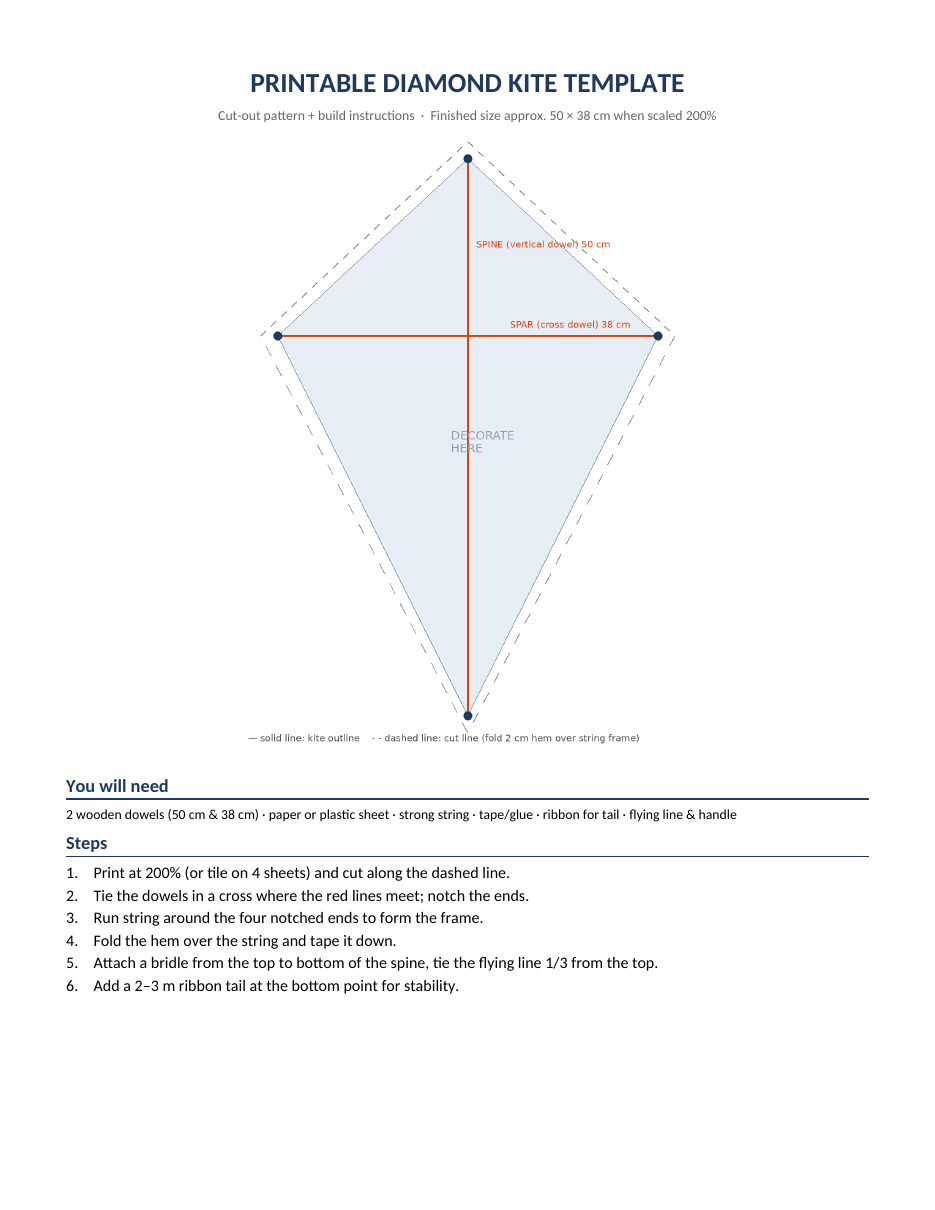
The template opens in Microsoft Word, Google Docs, LibreOffice Writer and Pages. Print it at 100% for a small decorative kite, or scale it to 200% or tile it across four sheets for a full-size flying kite.
Why build a diamond kite?
The diamond kite, sometimes called an Eddy kite, is the classic shape most people imagine when they think of kites. It is one of the easiest kites to make, needs only a few inexpensive materials and flies well in light to moderate winds. Its simple cross-shaped frame of two sticks teaches basic engineering ideas such as balance, symmetry and lift, which is why it is a favourite for school science lessons, scout groups and holiday crafts.
What the kite template includes
- A full diamond kite outline with the correct proportions.
- Spine and spar lines showing where to place the vertical and horizontal sticks.
- A dashed cut line with a hem allowance for folding over the string frame.
- Corner markers for attaching the frame.
- A "decorate here" area for drawings, patterns or names.
- A materials list.
- Numbered build instructions printed on the same page.
Materials you will need
- Two straight wooden dowels or bamboo sticks: about 50 cm for the spine and 38 cm for the spar.
- A large sheet of paper, tissue paper, a plastic bag or lightweight fabric for the sail.
- Strong string or thin twine for the frame and bridle.
- Tape and glue.
- Scissors and a craft knife (adult supervision required).
- Ribbon, crepe paper or plastic strips for the tail.
- Kite line or strong thread and a handle or stick to wind it on.
- Markers, paint or stickers for decoration.
How to make a diamond kite step by step
- Print the template. For a flying kite, print at 200% or tile the pattern across four sheets and tape them together.
- Trace the pattern onto your sail material and cut along the dashed line.
- Cut the dowels to length: 50 cm for the spine and 38 cm for the spar.
- Place the spar across the spine about a quarter to a third of the way down from the top, matching the red lines on the template.
- Tie the sticks together tightly where they cross, wrapping string diagonally in both directions, and add a dab of glue.
- Cut small notches in the ends of both sticks.
- Run string through the notches around the four ends to form a taut diamond frame, and tie it off.
- Lay the frame on the sail, fold the hem over the string and tape or glue it down all the way around.
- Make a bridle by tying a piece of string from the top of the spine to the bottom, leaving it slightly loose.
- Attach your flying line to the bridle about one third of the way down from the top, using a loop so you can adjust it.
- Tie a tail of 2 to 3 metres to the bottom point for stability.
- Decorate your kite and let any paint or glue dry completely before flying.
How to fly your kite
- Choose an open space away from trees, buildings, roads and power lines, such as a beach, park or field.
- Check the wind. Light to moderate winds, roughly 8 to 25 km/h, are ideal. Leaves and small branches moving gently are a good sign.
- Stand with your back to the wind and hold the kite up by the bridle point.
- Let out a little line and let the wind lift the kite from your hand. If needed, ask a friend to hold the kite a few metres downwind and release it.
- As the kite climbs, let out more line gradually.
- If the kite dives, let out line to reduce tension; if it sags, gently pull the line to increase lift.
- To bring the kite down, wind the line in slowly and steadily.
Troubleshooting kite flying problems
The kite spins or loops
Add a longer or heavier tail, or check that the frame is symmetrical and the spar is centred.
The kite will not lift
The wind may be too light, the kite may be too heavy or the bridle point may be too low. Move the line attachment slightly higher and use lighter materials.
The kite dives to one side
One side may be heavier or the sail may be uneven. Add a small piece of tape to the lighter side or adjust the tail.
The sail tears
Reinforce corners and the hem with extra tape, and avoid flying in very strong winds.
Decorating ideas
- Draw a colourful face, animal or monster.
- Paint bold geometric patterns that stand out in the sky.
- Use the colours of a favourite sports team or national flag.
- Write a name, message or wish in large letters.
- Create a rainbow sail from strips of tissue paper.
- Add streamers to the tail in matching colours.
- Make kites for a festival such as Basant or Makar Sankranti, where kite flying is a cherished tradition.
Kite making as a STEM activity
Building and flying kites teaches science in an engaging, hands-on way. Students can explore the four forces of flight, lift, weight, thrust and drag, and how the angle of the kite to the wind creates lift. They can test variables such as tail length, sail material and bridle position, record results and draw conclusions. Measuring and cutting materials builds maths skills, while decorating adds an art element. Teachers can print several copies of the template so every group builds the same base kite and compares modifications fairly.
Kite safety tips
- Never fly kites near power lines, roads, railways or airports.
- Do not fly in thunderstorms or very strong winds.
- Wear gloves when using strong line to avoid cuts.
- Avoid metallic or glass-coated strings, which are dangerous and banned in many areas.
- Keep a safe distance from other people and animals.
- Supervise young children, especially when cutting materials or handling line.
- Pick up all string and debris after flying to protect wildlife.
Kite festivals and traditions
Kites have been flown for more than two thousand years, beginning in ancient China and spreading across Asia and the world. Today, kite festivals bring communities together in many countries. In South Asia, spring festivals such as Basant fill the skies with colourful paper kites, while Makar Sankranti in India and Uttarayan in Gujarat are famous for rooftop kite flying. Japan, Bali, Thailand and many coastal cities around the world host international kite festivals featuring giant, artistic kites. A homemade kite built with this template is a wonderful way to join in the tradition.
Other kite shapes to try next
Once you have mastered the diamond kite, try other classic designs. A sled kite has no rigid cross-spar and is very easy to fly in gentle winds. A delta kite, with its triangular wing shape, is stable and climbs high. Box kites are three-dimensional and impressive, though more challenging to build. Fighter kites, popular during Basant, are small, agile and controlled with skilful line movements. Experimenting with different shapes is a great way to learn how design affects flight.
Frequently asked questions
Is the kite template free?
Yes. Download and print it free for home, school or community use.
What size should I print the kite template?
Print at 100% for a decorative mini kite or classroom craft. For a flying kite, print at 200% or tile the pattern across four sheets to create a kite about 50 by 38 cm.
What is the best material for a homemade kite?
Lightweight, tear-resistant materials such as plastic sheeting, ripstop nylon or strong tissue paper work best. Paper kites are easy to decorate but tear more easily.
How long should the kite tail be?
Start with a tail about two to three metres long, or five to seven times the length of the kite, and adjust until the kite flies steadily.
Can young children make this kite?
Yes, with adult help for cutting dowels and tying the frame. Children can trace, decorate and fly the kite.
Why won't my kite stay in the air?
Check the wind strength, the bridle position and the tail length. Most problems are solved by moving the line attachment slightly or adding tail length.
Related templates
Find more printable projects and creative designs with our poster templates, greeting card templates, lined paper templates and birthday invitation templates.